Cum reparam Windows 10 fara sa reinstalam (restaurare fisiere corupte sau lipsa)

Se intampla din diferite cauze (sectoare cu probleme pe HDD, stergere accidentala, etc) ca unele fisiere necesare la functionarea corecta a sistemului de operare sa dispara sau sa devina corupte. In ultimele versiuni de windows insa problema se poate rezolva fara reinstalare cu ajutorul catorva comenzi, rulata ca Administrator in Command Prompt. Trebuie insa sa ai conexiune la internet. Presupunand ca ai sau crezi ca ai probleme cu calculatorul si vrei sa verifici integritatea sistemului de fisiere, trebuie sa deschizi o consola Command Prompt ca Administrator si sa folosesti Deployment Image Servicing and Management tool.

Dai click pe Cortana sau Search, scrii acolo “command prompt“. O sa iti apara best match: Command Prompt Desktop App.
Dai click dreapta pe Command Prompt si alegi Run as Administrator.

  1. Introduci urmatoarea comanda in consola sfc /scannow
  2. O sa dureze ceva pana scaneaza toata partitia, apoi o sa iti apara una din urmatoarele raspunsuri:
    Windows did not find any integrity violations (a good thing)
    Windows Resource Protection found corrupt files and repaired them (a good thing)
    Windows Resource Protection found corrupt files but was unable to fix some (or all) of them (not a good thing)
  3. Daca sunt ceva probleme incercam sa reparam folosind urmatoarea comanda: DISM /Online /Cleanup-Image /RestoreHealth
  4. Dupa ce termina de executat si aceasta comanda, mai reluam odata comanda de la pasul 1 ca sa ne asiguram ca restaurarea sistemului s-a facut complet si corect.

Articolul original in engleza poate fi gasit AICI.


Send to Kindle
Facebooktwitterredditpinterestlinkedin

WINDOWS 10 – Wake On LAN WOL Does Not Work After Update – SOLVED

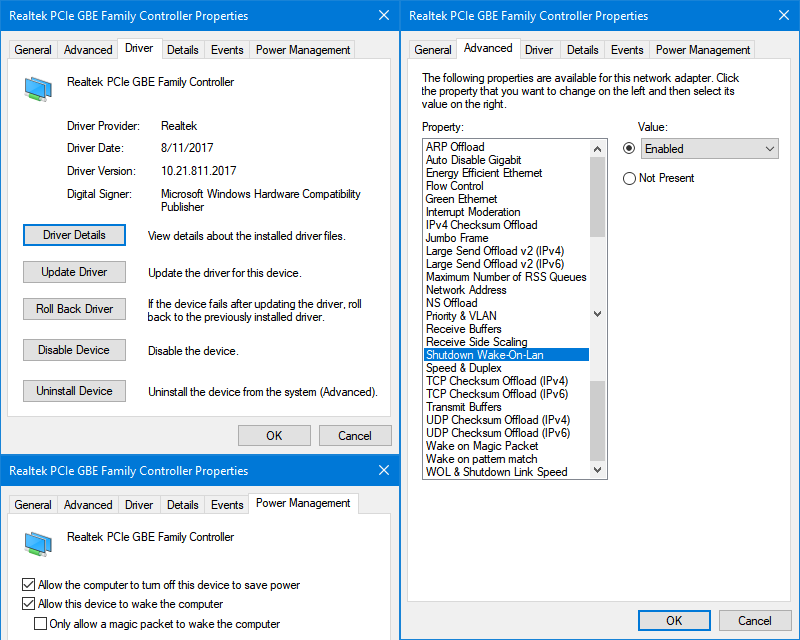
If you have a Realtek Network Adapter, the problem might be the Microsoft driver that is updated along with the operating system, replacing your network driver that worked fine when you needed to wake your computer after a normal shutdown. So you just need to update the network driver to the latest version that is available for download on Realtek website.

Download link for Realtek Latest Network Drivers: realtek.com.tw

Then you need to set Shutdown Wake-On-Lan to be Enabled and restart your computer.
We assume that BIOS settings are correct and Wake-On-Lan for PCI devices is enabled, and the rest of windows settings are all correct.

If it still does not work do this:

Step 1: Open the Power Option item in control panel.
Step 2:
Click the Choose what the power buttons do link.
Step 3:
Click Change settings that are currently unavailable.
Step 4:
Clear the Turn on fast startup(recommend) check box.
Step 5:
Click Save changes.

Send to Kindle
Facebooktwitterredditpinterestlinkedin

WINDOWS 10 – Tips & Tricks

Disable automatic updates for STORE apps

Deschidem STORE – calculatorul trebuie sa fie conectat la internet, dam click pe cele 3 puncte … din partea dreapta sus, apasam butonul SETTINGS apoi debifam toate bifele.

Enable SAFE MODE (F8) on WINDOWS 10

In Windows 10 a disparut posibilitatea de a porni computerul in Safe Mode apasand tasta F8 in timp ce booteaza. Exista totusi posibilitatea de a restaura aceasta facilitate. Urmeaza pasii urmatori:

  1. Da click pe Cortana sau Search si scrie acolo command prompt.
  2. La best match o sa iti apara Command Prompt – Desktop App
  3. Click dreapta pe aplicatie, Run as Administrator
  4. Porneste consola Command Prompt si introducem urmatoarea comanda exact asa cum apare aici – poti da copy si apo paste in consola (click dreapta): BCDEDIT /SET {DEFAULT} BOOTMENUPOLICY LEGACY
  5. Apesi pe Enter. La urmatorul reboot daca vei apasa F8 windows va porni in SAFE MODE
  6. Daca vrei sa restaurezi modul standard in care F8 nu este disponibil pentru a porni safe mode urmezi aceeasi pasi insa in consola dai urmatoarea comanda: BCDEDIT /SET {DEFAULT} BOOTMENUPOLICY STANDARD

Disable or delete hiberfil.sys file on windows 10

  1. Right click pe START > Windows Power Shell (Admin) > introducem urmatoarea comanda pentru renuntarea la hibernare care va sterge fisierul si va elibera vreo 2 GB de spatiu pe HDD: powercfg.exe -h off sau powercfg.exe -h on daca vrem sa reactivam fisierul de hibernare. Acest fisier are de obicei o dimensiune egala cu cca 25% din RAM si ramane salvat pe HDD ocupand loc degeaba.
  2. Dupa ce introducem comanda si apasam enter nu va aparea niciun mesaj de confirmare in consola de comanda dar va trebui sa dai restart la computer.

Disable System Restore on all drives

  1. Right click pe My Computer > Properties > System Protection
  2. La toate discurile apasam pe Configure si punem bifa la Disable System Protection

Disable autorun for CD/DVD and USB sticks

  1. Click pe START > Settings (iconita settings) > Devices > Autoplay
  2. Aici trecem “Use autoplay for all media and devices” pe OFF si Take no action pentru Removable drive precum si pentru Memory card

Disable Superfetch service

Superfetch poate fi util dar este foarte enervant cand incepe sa foloseasca HDD-ul si iti da impresia ca nu se mai opreste. Prin urmare mai bine il lasam pe disable.

  1. Right click pe Start, Run > scriem services.msc si apasam pe enter
  2. Derulam lista serviciilor pana ajungem la Superfetch dam dublu click pe el, apasam pe Stop si apoi trecem Startup type pe Manual

Disable arrange windows automatically

  1. Click pe START > Settings (iconita settings) > System > Multitasking > Snap
  2. Trecem pe OFF toate optiunile

Show Control Panel on Start menu

  1. Right click pe START > Search > scriem Control Panel fara sa apasam enter
  2. La Best Match o sa apara “Control Panel”, dam click dreapta pe el si apasam Pin to Start sau Pin to Taskbar dupa preferinta

Advanced Settings for Windows Firewall

  1. Click pe Control Panel > System and Security > Windows Firewall > Advanced Settings
  2. Putem creea atat Inbound Rules cat si Outbound Rules
  3. In registrii setarile le gasim aici: HKEY_LOCAL_MACHINE\SYSTEM\CurrentControlSet\Services\SharedAccess\Parameters\FirewallPolicy\FirewallRules

Allow an App through Windows Firewall

  1. Click pe Control Panel > System and Security > Windows Firewall > Allow an App through Windows Firewall
  2. Dam click pe aplicatia respectiva, apasam butonul Change Settings in partea dreapta sus si scoatem sau punem bifa in dreptul aplicatiei, apoi apasam pe OK

Monitor Calibration in Windows 10

  1. Click pe START > Settings > System > Display > Display Adapter Properties > Colour Management > Advanced > Calibrate Display
  2. Resetam setarile monitorului la factory default din meniul monitorului apoi urmam toti pasii de calibrare


Send to Kindle
Facebooktwitterredditpinterestlinkedin